Equipping the T29
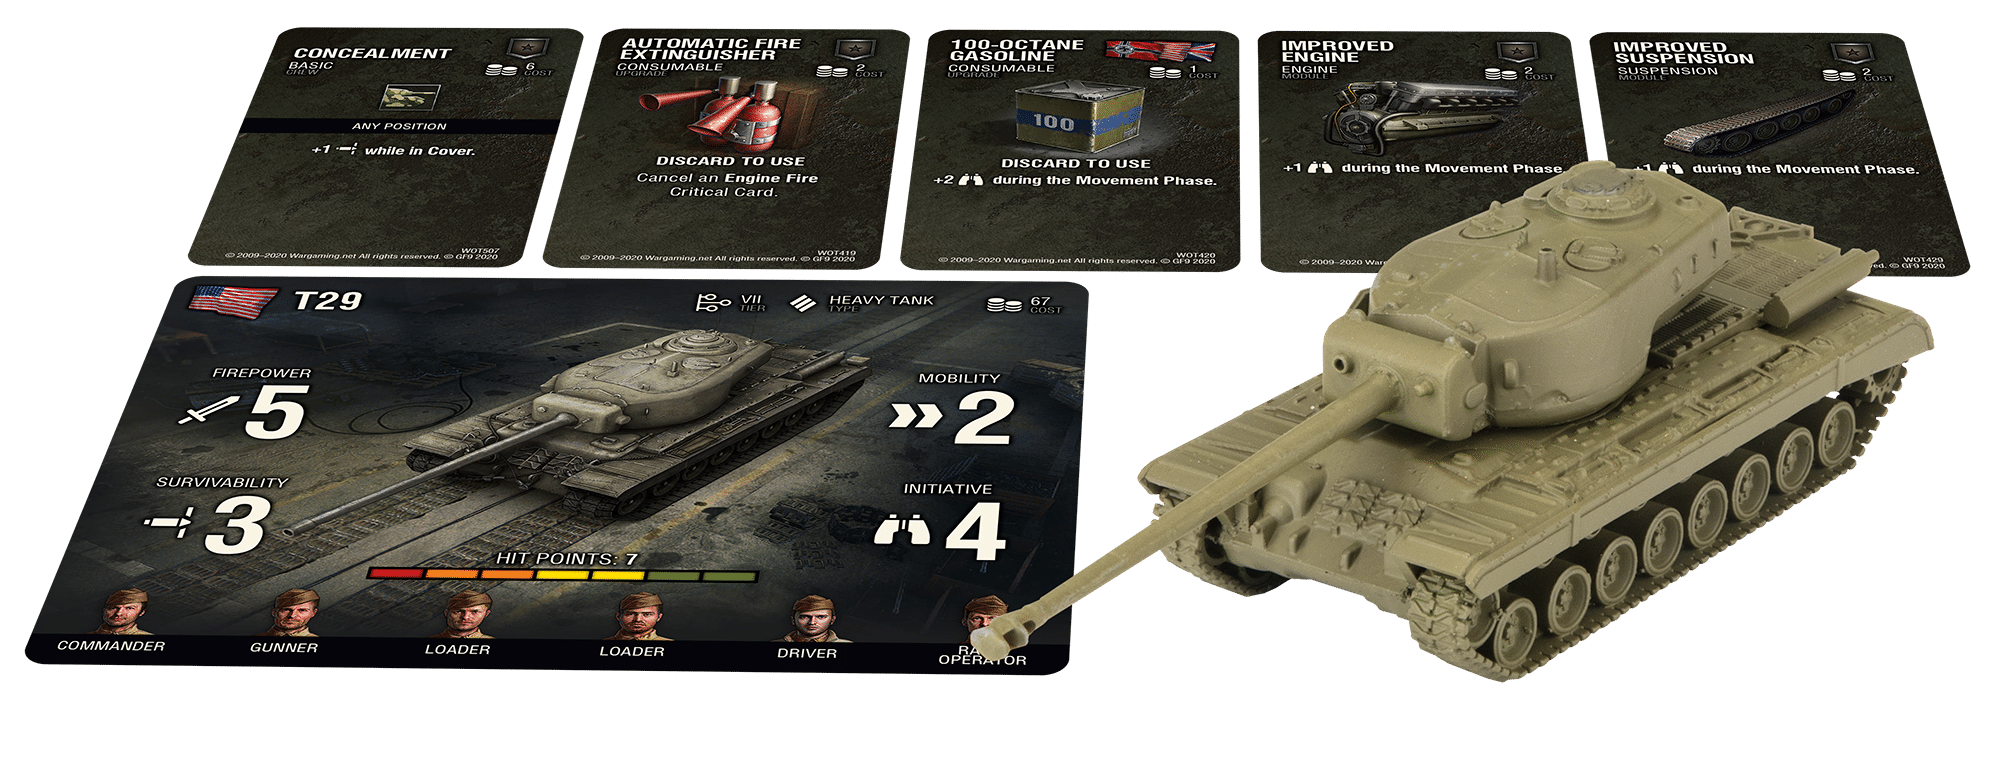
The T29 is the start of the most recognisable Heavy Tank line to come from American tank development. Building upon the proven M26 Pershing chassis, the T29 fits more armour and crew into a mobile platform extremely capable of brawling head-to-head for battlefield dominance. Where the T29 comes into its own is the 67 points cost, giving you plenty of room to upgrade and customize it as you see fit to fill multiple roles on the battlefield, whilst maximising the potent combination of Survivability 3 and the Heavy Tank rule. There is a range of cards available with the 2023 Starter Set that we can use to tip the scales and craft the ultimate brawler.
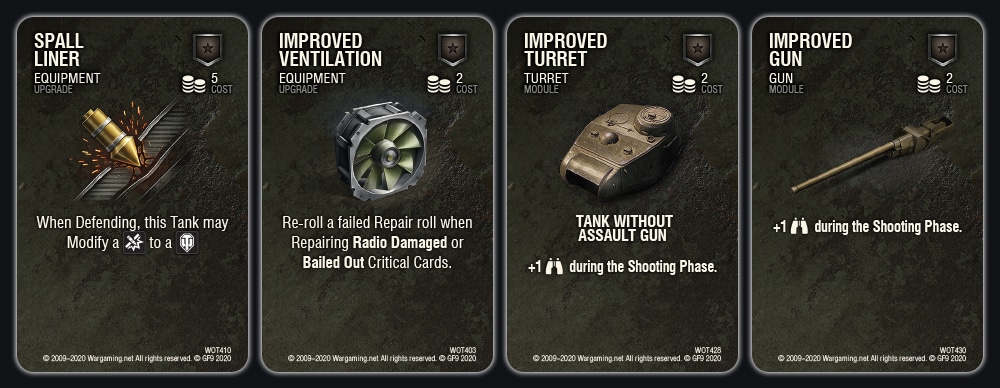
What keeps the T29 affordable is the relatively limited Hit Points that it has access to. The key to making the T29 work on the battlefield therefore will be to make the most of these Hit Points wherever possible. The Heavy Tank special rule is the first step in this process, giving us the opportunity to re-roll a defensive die should we roll a blank. On top of this, being able to decide to cancel Critical Cards is a powerful tool to reduce the odds of bigger damage being done. Equipping Spall Liner is a very sensible option on any Heavy Tank and the T29 is no different. Maximising the defence dice pool gives you the most chance to block incoming rounds, and adding two dice for the Mobility 2 of the T29 will quickly allow you to maximise the Survivability 3 that this Tank has. If your T29 is Bailed Out it’s a sitting duck, so equipping Improved Ventilation is a solid choice to allow you the chance to re-roll a failed Repair roll when Repairing Bailed Out or Radio Damaged Critical Cards.
In saying all of that, the best way to avoid taking unnecessary damage is to remove the threat before it can shoot you! At only 4 Initiative the T29 will find it hard to accomplish this in a brawl without some points invested in Initiative upgrades. There are plenty of good options available to you in the 2023 Starter Set to bump these numbers up, and two great examples of this are Improved Turret and Improved Gun, both individually giving you +1 Initiative during the Shooting Phase. If you play the T29 up close and personal to get the benefits of Close Range and Side Shot, shooting first gives you great potential to remove the threat of any opposition you’re brawling!
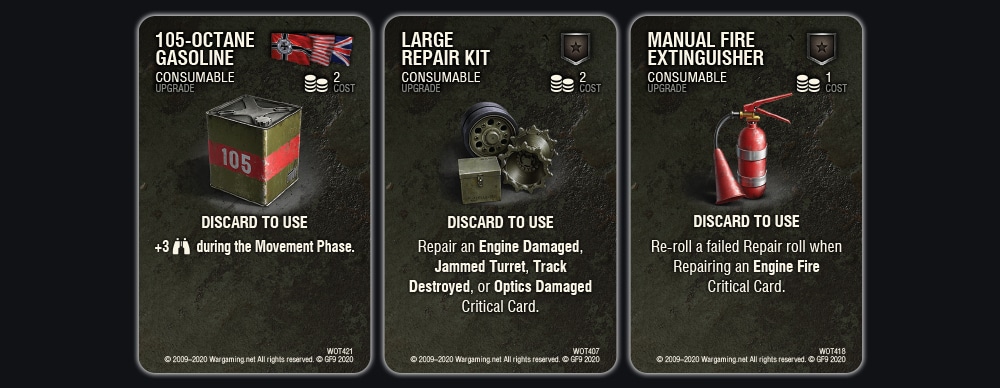
When the fighting gets close, gaining the upper hand at critical moments can be the difference between winning and losing. While Initiative 4 might not have the biggest impact at the start of the battle, you might find that there are key moments where you need your T29 to manoeuver after your opponent’s movement to ensure that you’re getting Side Shots, or avoiding them yourself. In these scenarios, having 105-Octane Gasoline can prove to be invaluable, giving you +3 Initiative during the Movement Phase. This is a massive bump that should comfortably take your Initiative high enough to allow you to move after your opponent, especially if you’ve taken any other Movement Phase Initiative boosts. In addition to this, consumables are a great way to keep the T29 in the fight and keep it fully operational at all times. Large Repair Kit removes any RNG when it comes to Repairing any of the detrimental effects of Engine Damaged, Jammed Turret, Track Destroyed or Optics Damaged, allowing you to stay on the move and shoot with full effect. Alongside this, taking a Manual Fire Extinguisher is always a wise investment, as an unchecked Engine Fire is the easiest way for your Hit Points to be depleted.
The T29 is the perfect Heavy Tank to build a platoon around, providing the core of your platoon with the Survivability and Hit Points to anchor Objectives or the centre of the battlefield. Upgrading the T29 will leave you with plenty of room to experiment with different supporting options, even at 200 points. Taking two T29s is very much on the cards, giving you a combined 14 Hit Points and 10 Firepower with points to spare on upgrades and supporting options, such as the M18 Hellcat. Or, pair an upgraded T29 with the pseudo-heavy T26E4 Super Pershing for another All-American heavy-hitter squad.
Equipping the IS-3
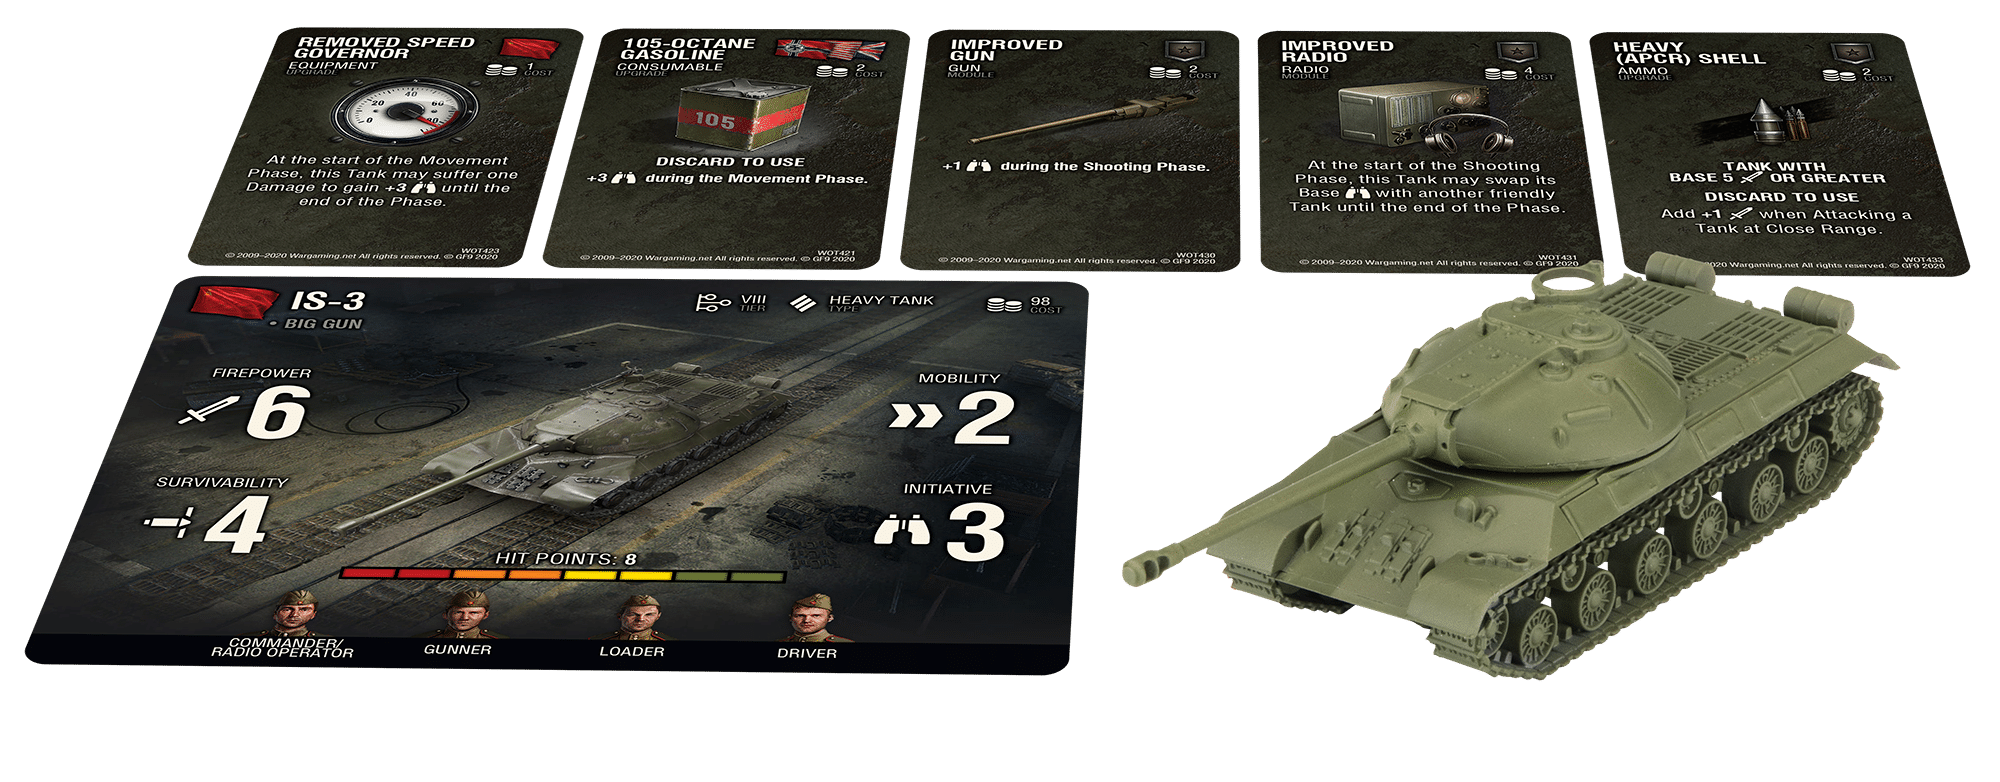 The IS-3 pioneered Soviet Heavy Tank design, with the visually iconic semi-hemispherical turret and piked frontal armour, always coupled with largest calibre gun they could fit. With a big 4 Survivability and a generous helping of Hit Points the IS-3 will be a threat to be wary of on the battlefield, and will require careful co-ordination to remove whilst trying to avoid getting on the wrong end of its dangerous 122mm gun. At 98 points the choice is yours whether you want to add upgrades to the IS-3 or not, but even adding just a few will go a long way to making this Heavy Tank even more lethal.
The IS-3 lends itself to being a very dynamic Heavy Tank. The combination of big Firepower, big Survivability and decent Mobility allows the IS-3 the freedom to multiple styles of playing depending on the mission and the role you’ve taken it for, able to advance and brawl with the Firepower and Mobility or sit back and use the Stationary re-rolls to push damage through whilst remaining confident with the 4 Survivability. Where the IS-3 lacks however is the 3 Initiative. Moving first and shooting last could leave your IS-3 vulnerable to flanking shots and potentially have it destroyed before you have the opportunity to shoot back. Equipping Initiative boosting Modules and Upgrades like Improved Engine and Gun Rammer are worthwhile options to start improving your Initiative in both the Movement and Shooting Phases. Training a Loader with Safe Stowage is also a viable option here, giving you another +1 Initiative during the Shooting Phase.
The 6 Firepower will allow the IS-3 to make relatively quick work of enemy tanks, especially those caught unawares. However, when getting in close and personal, having the ability to push just that little bit more damage through could turn the tables in your favour. Taking Heavy APCR Shells is a no-brainer if you plan on closing in to close range, as there is nothing better than adding +1 to your Firepower. This could also stack with the Light Tank bonus if you have a friendly Light racing around, allowing your IS-3 to roll 8 dice in an attack. This, combined with the reduced defence dice for Close Range and Side Shot if you can outmanoeuvre your opponent, could see less-armoured vehicles going up in flames in a single hit! To help with outmanoeuvring your opponents, taking Removed Speed Governor allows a momentary +3 Initiative boost during a Movement Phase at the cost of 1 Damage. If you do decide to take Ammo cards it’s doubly beneficial to have Safe Stowage, as should you get dealt the Ammo Damaged Critical Card you won’t suddenly find yourself missing half of your Hit Points.
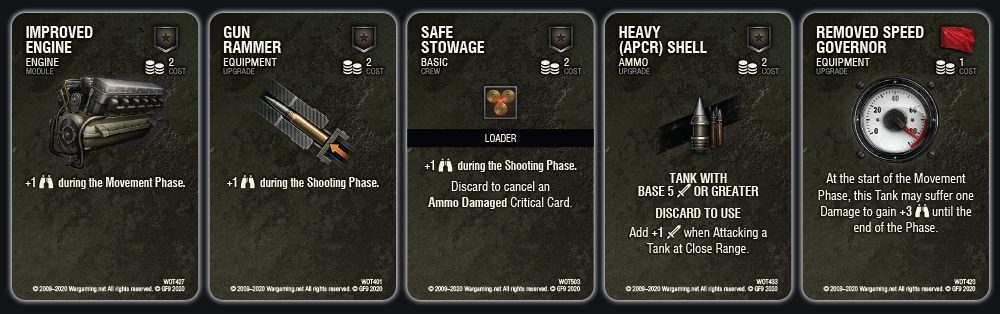
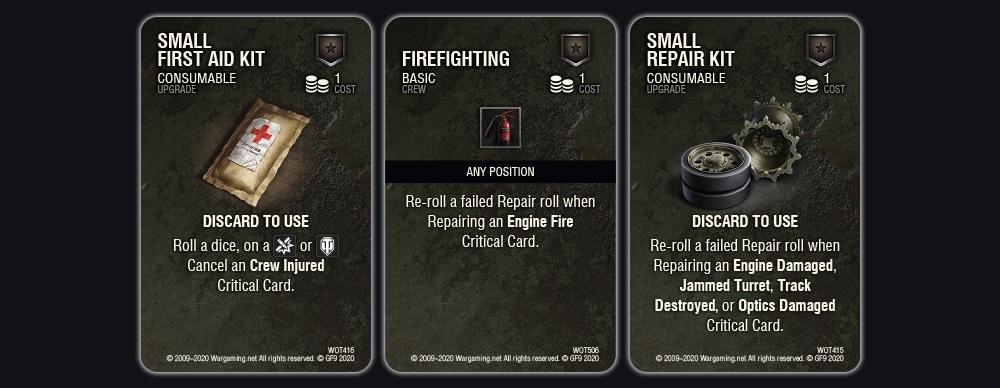
As we’ve discussed, receiving Critical Damage will severely reduce the effectiveness of any Tank, and the IS-3 is no different. The moment your Firepower or Mobility are hindered your 98-point monster is suddenly not worth its points and can be quickly overrun and overwhelmed. Small Repair Kit is worth taking just for this reason, giving you the opportunity to re-roll a failed Repair roll if you find yourself having to Repair an Engine Damaged, Jammed Turret, Track Destroyed or Optics Damaged Critical Card. In the same vein, training Firefighting on a crew member goes a long way to ensuring you don’t end up literally burning away your Hit Points. Finally, having the Crew Injured card dealt to you can have consequences later in the battle alongside the increased damage it deals, so equipping a Small First Aid Kit gives you the chance to stop this card in its tracks.
Upgrading your IS-3 will very quickly take it over the 100-point mark, but this still leaves you with plenty of platoon options. With the IS-3 being great at pushing forward and engaging, consider building your platoon around this feature and including aggressive Mediums and Lights, or even considering an Artillery to provide indirect fire support. The Light Tank special rule can go a long way in increasing the lethality of the IS-3, so taking a T-70 or a Crusader will always provide you with some benefit. Alternatively, a well-armoured Medium with good Firepower could secure your flank while the IS-3 dominates the objectives in play. The choice is all yours!
Click here to read Part 1 on how to equip your Maus and Centurion Mk. 1
